Using PlantCV with Jupyter Notebooks
About Jupyter
Jupyter Notebook is a web application that allows you to create documents that contain code, outputs, and documentation. The code in Jupyter Notebooks can be re-executed to refresh outputs after you change a section of code. Jupyter Notebooks support many programming languages. See http://jupyter.org/.
How to use PlantCV with Jupyter
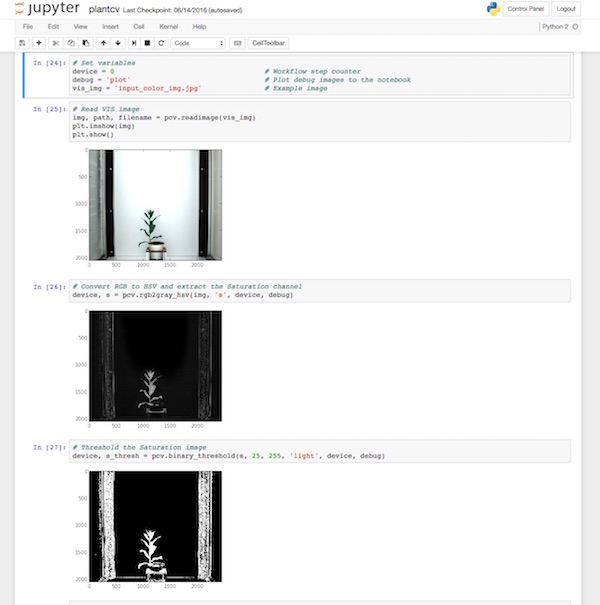
In previous versions of PlantCV, debugging image analysis workflows required running scripts with debug mode enabled so that intermediate output images would be created for each step. In the latest versions of PlantCV, analysis workflow scripts can be developed in Jupyter Notebooks so that the input and output images of each step in a workflow can be visualized instantly within the notebook.
Example of PlantCV running in Jupyter
PlantCV is automatically set up to run in Jupyter Notebook but you will need to install Jupyter.
For example, with conda:
conda install nb_conda jupyterlab
Then you can launch Jupyter from the command line jupyter lab and create a notebook using
a kernel containing your PlantCV environment.
First, we use matplotlib to do the in-notebook plotting. To make this work, add the following to the top of your notebook:
%matplotlib inline
Second, you can import the PlantCV library like normal:
from plantcv import plantcv as pcv
Third (optionally), utilize PlantCV's WorkflowInputs class to organize and name workflow inputs for compatibility with running the workflow later in parallel.
PlantCV has a built-in debug mode that is set to None by
default. Setting debug to "print" will cause PlantCV to print debug
images to files, which is the original debug method. In Jupyter, setting
debug to "plot" will cause PlantCV to plot debug images directly into
the notebook.
Bringing it all together, the first part of a notebook running PlantCV would look like the following example:
%matplotlib inline
from plantcv import plantcv as pcv
from plantcv.parallel import WorkflowInputs

# Set input variables
args = WorkflowInputs(images=["./input_color_img.jpg"],
                      names="image",
                      result="plantcv_results.csv",
                      debug="plot")

# Set variables
pcv.params.debug = args.debug
Converting Jupyter Notebooks to PlantCV workflow scripts
Once a workflow has been developed, it needs to be converted into a pure
Python script if the goal is to use it on many images using the PlantCV
workflow parallelization tools. To make a
Python script that is compatible with the plantcv-run-workflow program,
first use Jupyter to convert the notebook to Python. This can be done
through the web interface (File > Save and Export Notebook As... > Executable Script),
or on the command line:
jupyter nbconvert --to python notebook.ipynb
The resulting Python script will be named notebook.py in the example
above. Next, open the Python script with a text editor. Several
modifications to the script are needed. Modify the list of imported
packages as needed, but in particular, remove
get_ipython().magic('matplotlib inline'). Change from plantcv.parallel import WorkflowInputs
to from plantcv.parallel import workflow_inputs.
Change the code for managing inputs, for example:
args = WorkflowInputs(images=["./input_color_img.jpg"],
                      names="image",
                      result="plantcv_results.csv",
                      debug="plot")
To:
args = workflow_inputs()
See workflow_inputs for more details.
Make any other alterations as necessary after testing. Based on the simple Jupyter Notebook example above, the fully modified version would look like the following:
from plantcv import plantcv as pcv
from plantcv.parallel import workflow_inputs

# Get command-line options
args = workflow_inputs()

# Set variables
pcv.params.debug = args.debug  # Replace the hard-coded debug with the debug flag

img, imgpath, imgname = pcv.readimage(filename=args.image)

# Put workflow
# steps from
# Jupyter here

# Print data that gets collected into the Outputs
pcv.outputs.save_results(filename=args.result, outformat="json")
There are examples of full Python scripts found at the bottom of each tutorial.